Welcome to my blog about the development cycle of the Everchase
Everchase Developement Cycle
Week 1
Introduction
Greetings.
My name is Filip Nejedly and I am a first-year student of Game’s Technology at Coventry University. As part of our coursework we are to make a 3D game in unity, working as a team of six.
During the first week we have agreed to develop the Everchase, a parkour based game and divided the work somewhat. My first task is to design the in game menu to be both User-Friendly and nice to look at.

Menu Design
As the first step I have decided to design the buttons. After looking up some works of big studios to see what such menu usually looks as, I have made my own design and shared it. Everyone was on board though I am not quite content as I don’t know what the game design will be yet and am worried about it’s compatibility. Next step would be setting up the menu in game but for that I require a github which is not ready yet.
Week 2
Week 2 of the Everchase development cycle followed up on what I did last week. With us moving further away from the parkour only game to something more of a Doom style dungeon with parkour elements. The game got a neon kind of look now. Objects are made of black filling with outlines of shiny colours and we have agreed on making these significant. That means red objects are dangerous or enemies, purple places can be wall ran on and such.
Menu Design
This change in style has lead to me moving away from the previous design towards something more similar to the look of the game. On top of that I started to consider the previous design somewhat unwieldy and not quite pleasing to the eyes.
As such I have recreated all the buttons for that reason and ended up with this style:


Week 3
Week 3 arrived and with it probably the least productive time of the development as I was still lacking the git repository (in reflection, I should have made one myself) and thus lacking any ability to actually work on the project itself. Overall we further developed the final idea of the project and I have done some minor designing work. Outside of that we properly split the project for everyone – I am supposed to make a pleasing and functional menu then possibly help with level design.
Week 4
Github finally got the repository and with that I started working on the project proper. My first job was to set up the panels with buttons and transitions between them. After some minor trouble with getting the graphic I made in previous weeks to run since it refused to let them be used until I changed the properties, I have made a script to switch between three canvases to alter the buttons. A bit later bothered by this look I have rewritten the script to work with only one canvas and the menu comes out from the edges of the screen.
The Menu Transition Script
The script bellow shows how I have dealt with the whole thing – it moves the menus and makes the buttons do things. Right now its still clunky and as such I will return to it later, mostly to fix the imprecision of the transition – right now the menus don’t quite return to where they started. I expect this is more of a matter of math than coding.
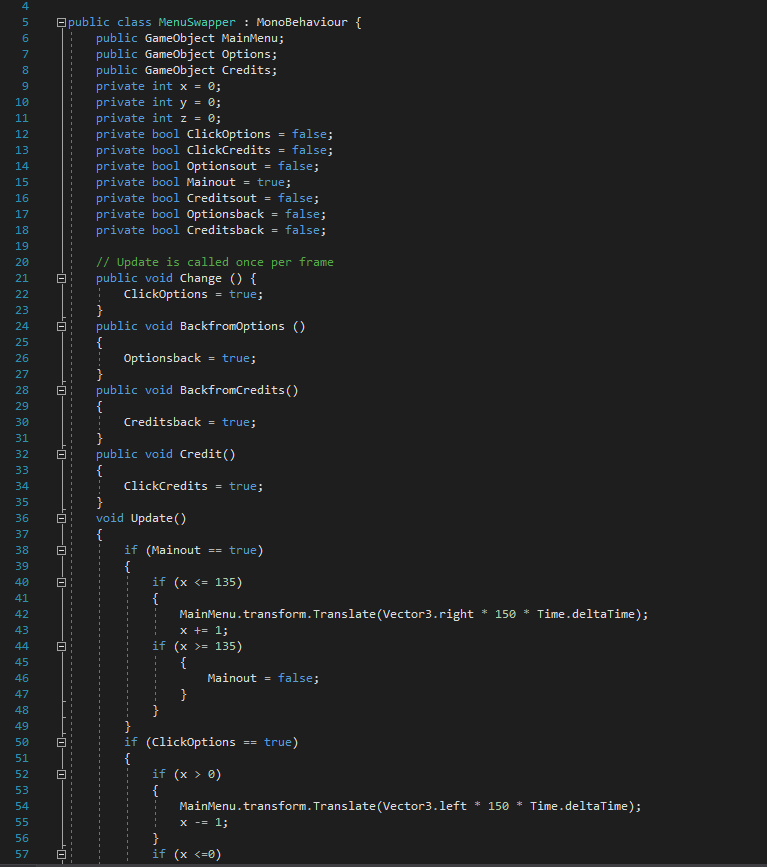

In hindsight it would have been better to use case select but I have only found out about its existence after writing this article. It would have made it much simpler and more optimized as this one will be forced to go through all the if statements and booleans. I will possibly redo that later down the line if there is enough time but now my priority is on making the menu fully functional with all the buttons.
Week 5
This week I continued working on my menu. After making the animation I started to work on the rest of the buttons and other similar effects. I have started with the Credits animation which is now rolling from the bottom and shows the names of people who are working on the project. I had to deal with a problem regarding the text going out of the designated place as I thought they could only be visible on their own canvas which was wrong. Eventually I have used sprite mask to hide them fixing this problem. They also return back to the starting spot after you leave the page. There is still a small problem with their placement to fix. As I focus on other modules this is the extent of what I did this week. Next time I plan to look at Sound scripts and Resolution.
Week 6
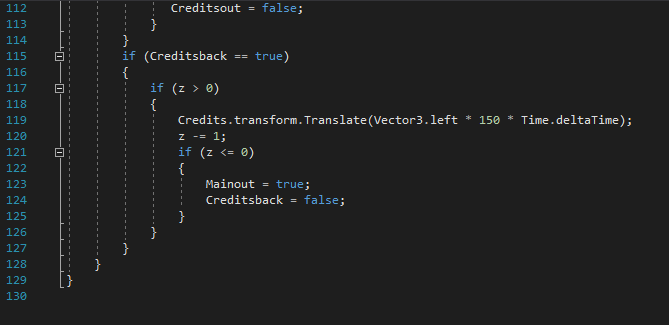
This week I have planned to focus on making the Options menu fully functional starting with sound. This wasn’t a big problem since I have done it before and I already know that the slider and mixer don’t move the same so I had to use logarithms to change that using the following script.
The script is absolutely basic, though efficient way to fix the issue. I have yet to test the sound as there is none present in the files but I will test that as soon as it is delivered.
Resolution
Next up on my list were resolutions. I have started with a drop-down menu but as it was very hard to work with I eventually changed to a text window surrounded by two buttons – Next and Previous. The Text menu would take all of the screens resolutions into a list and then through the usage of these buttons it would let you change it. The problem was that if you changed from a fullscreen to a windowed or changed your screen it could get stuck outside of the array so ultimately I had to scrap it and try again next week. I am already considering just making several canvases and switch between them as you choose the resolution which is an inefficient way to do it but possibly the only one I am capable of right now.
Week 7
This week I have planned to work further on the resolutions and polish the menus. First lets look at the resolutions.
Resolutions
Working on the resolutions was troubling as I couldn’t quite get it right. No matter what I tried there always seemed to be some problem I couldn’t deal with. Eventually I have just scaled the canvas to the resolution size and fixed it as that. At this point I would go and make several of them, then use the script for turning canvases on and off to change it – as I have first used this script to change the menu’s it would just mean reusing a scrapped script and moving some objects. This would however take quite a long time with very little skill otherwise required and as such I am just proposing the solution here.
Usability
After a some feedback I have gotten by showing the project off to some friends, I have decided to make the menu unroll faster making the overall animation a bit smoother since I was told several times that it is horribly slow. I have also aligned the credits properly and fixed some minor bugs with the menus not hiding fully. As I am behind on some of the other projects I will use next few weeks for that and get back to the game later.
Week 10
Week 10 is here after I caught up on both of my other projects and I can get back to the Everchase. This week I wanted to get back to a thing I completely forgot to do and thus I had to get back to it right now.
3D Art
One of the things I was supposed to make is a mesh for the project. As I only got around to doing it now that is quite difficult especially since the game is pretty much finished already.
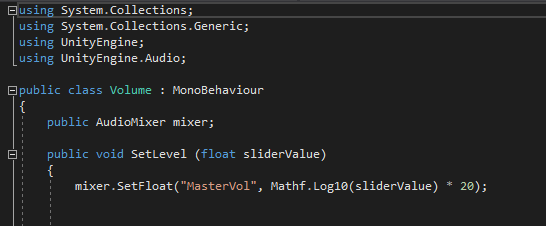
Since I personally really enjoy procedural generation of materials (after I spent quite a while on it last week) I picked an object where I can play around with it a bit and decided to make some metallic crates. My idea was that something like crates can be very easy to implement into the game but with how I make materials compared to other people it didn’t really fit the style in the end. This led to me never implementing the crates but since its still a part of what I did, I decided to put it here anyway.
My first idea was to make some kind of rusty and damaged crate which didn’t work out as expected partially because my computer struggles mightily to keep up with the generation which then stopped me from working out some kinks of where these rust spots generate (they sometimes ended abruptly on an edge) and also it not looking as good as I expected on the crate design I have made. Here is how the material itself looks:
This not working has led to me redoing the whole material work and eventually I have finished up with two of them – a metallic outline and polished blue paint. This is a picture I took right before rendering as I couldn’t get the light just right.

